Difference between revisions of "Quantar"
| (4 intermediate revisions by the same user not shown) | |||
| Line 123: | Line 123: | ||
=== Manuals === | === Manuals === | ||
| + | * [[Media:Motorola Quantar Instruction Manual.pdf|Motorola Quantar Instruction Manual 68P81095E05-B with updates]] - Most comprehensive manual | ||
| + | |||
* [[media:Quantar Satellite Receiver Instruction Manual 68P81087E25-O.pdf|Quantar Satellite Receiver Instruction Manual 68P81087E25-O.pdf]] - This is the manual for Satellite Receiver (not AstroTac Receiver), which is basically a Quantar minus the PA/Exciter. The advantage to this is it can be used where wildcard functions are need. | * [[media:Quantar Satellite Receiver Instruction Manual 68P81087E25-O.pdf|Quantar Satellite Receiver Instruction Manual 68P81087E25-O.pdf]] - This is the manual for Satellite Receiver (not AstroTac Receiver), which is basically a Quantar minus the PA/Exciter. The advantage to this is it can be used where wildcard functions are need. | ||
| Line 145: | Line 147: | ||
* [[Winrss help|RSS Software Help file.]] - this is the help file from WinRSS and is quite useful for station programing tips. | * [[Winrss help|RSS Software Help file.]] - this is the help file from WinRSS and is quite useful for station programing tips. | ||
| + | |||
| + | * [[Quantar Serial Commands]] - Info on the serial commands the quantar station supports from the RSS port. | ||
== Hardware info == | == Hardware info == | ||
| Line 154: | Line 158: | ||
The -48v supplies are easy to see as they have a side to side DC breaker style switch. The Motorola/Onan column refers to the manufacturer of the PS. Many people rag on the Onan power supplies, but I've not had one fail in service yet. The Onan do have a heat activated fan, whereas the Motorola run continuously. This can be good for base use or in the lab, as the base station will not make noise unless it's keyed down for some time. | The -48v supplies are easy to see as they have a side to side DC breaker style switch. The Motorola/Onan column refers to the manufacturer of the PS. Many people rag on the Onan power supplies, but I've not had one fail in service yet. The Onan do have a heat activated fan, whereas the Motorola run continuously. This can be good for base use or in the lab, as the base station will not make noise unless it's keyed down for some time. | ||
| + | |||
| + | |||
{| class="wikitable" style="background-color:#D6DCE4; width: 60%;" | {| class="wikitable" style="background-color:#D6DCE4; width: 60%;" | ||
| Line 182: | Line 188: | ||
|TPN1186||No idea|| ? || | |TPN1186||No idea|| ? || | ||
|} | |} | ||
| + | |||
| + | Several PSUs have a DC input on the back using a special connector pictured below. This is an [https://www.te.com/en/product-530521-3.html AMP/TE 530521-3] 4 position connector. The contacts are 5-530519-2 | ||
| + | |||
| + | <gallery mode=packed-hover> | ||
| + | Quantar-DC-Connector-00001.jpg | ||
| + | Quantar-DC-Connector-00002.jpg | ||
| + | Quantar-DC-Connector-00003.jpg | ||
| + | </gallery> | ||
=== [[Quantro/Quantar-Backplane|BackPlane]] === | === [[Quantro/Quantar-Backplane|BackPlane]] === | ||
| Line 200: | Line 214: | ||
* EPIC IV - '''This is only for the Smart Zone trunking. IT will not work for conventional''' | * EPIC IV - '''This is only for the Smart Zone trunking. IT will not work for conventional''' | ||
* [[EPIC V| EPIC V - MCLN8447]] | * [[EPIC V| EPIC V - MCLN8447]] | ||
| + | * EPIC 6 - lol it doesn't exist. <ref>my theory on this is eBay sellers searched the part number CLN7692 and found this page and then read 'IV' as 6 not 4. https://www.youtube.com/watch?v=Exiy5eVMzg4</ref> | ||
{| class="wikitable" style="background-color:#D6DCE4; width: 60%;" | {| class="wikitable" style="background-color:#D6DCE4; width: 60%;" | ||
Latest revision as of 14:38, 25 December 2025
Quantar/Quantro info
There is a bunch of info here about the technical aspects of the Quantar Stations.
The info on the modification and changing ranges of the various modules is on the respective pages. There is some conversion info below, but it's being migrated and reformatted under the respective pages. I feel this is more logical.
If you find anything to be wrong here, please feel free to make an account and change it. I've had to lock down account creation, so you'll need to have it approved. If you want to email me directly, my email is bryan@bryanfields.net
Specifications
Quantar Specifications VHF, UHF, 800 MHz - This is the combined spec sheet for the VHF/UHF and 800 base stations.
Quantar Data Base Station Specification Sheet 800 900 MHz
ASTRO TAC QUANTAR receiver manual
Programming
Links to programming stuff
CSS 007.13.R022.0035 for EPIC4 Smart Zone SCM
WinRSS 14.10.00 release July 15 2011.zip
WinRSS 14.13.00 April 2015 Current Winrss - narrowband only. Use the rsscore.dll from 14.12.00 will re-enable wideband. Or just run 14.12.00.
DIU3000 CPS/CSS software 8.00.18 30-APR-2005
Firmware
The newer SCM modules can be upgraded via SLIP connection over the tty port, or via IP over the 10Base2 connector (anyone have a hub?).
The Wireline typically will upgrade during this too, unless it has the older EPROM memory. At that point you'll have to swap the chips.
The exciter is still a hard chip swap upgrade, but programed EPROM's are $20 shipped on eBay. Unless you have more than a few to upgrade it's not cost effective to buy the programer and chips yourself.
SIMM Images
The SIMM has a boot1 image which is a basic bootloader (0x460-0x3ffff). This runs just after the bootstrap code (0x000 0x45f). The bootloader (boot.o) contains basic code to initialize the hardware and validate the boot2.o, sc.o and wl.o images stored in the SIMM. It also has a slip loader in it. With only the boot.o code running it's possible to reload the entire OS at 9600 baud via the front port.
The boot.o is the only code not able to be upgraded on the SIMM via SLIP/FTP. To upgrade boot.o you need to flash the SIMM directly. Normally boot.o does not matter, but it is different for IR and NIR stations. The other issue is the newer (EPIC III) SCM cards will not boot with boot.o 020.10.001, and need at least the 020.10.008 code. The newest boot code is 020.10.012, and the images below have that code on them.
Conventional Firmware for U1-U4 on the SIMM module 20.14.048
- media:NIR-R020.12.048 B2-R020.14.15 B1-R020.10.12.zip -- Most current firmware, works on all SCM boards.
- media:Quantar-Flash-Simm-EPIC2-NON-IR-FW-20.14.048-Boot-020.10.001.zip -- Don't use, older code for historical reference only
IntelliRepeater (IR) Firmware for U1-U8 on the two bank SIMM module 20.14.520
This is for the old B013.05.014 EPIC I firmware that would run from the 27C040 PROMs. It's here for reference, don't use it.
Hacking info
How to combine the firmware into a single binary image

srec_cat -Output 20.14.038-SIMM.bin -Binary \
"U4.bin" -Binary -unsplit 4 0 \
"U3.bin" -Binary -unsplit 4 1 \
"U2.bin" -Binary -unsplit 4 2 \
"U1.bin" -Binary -unsplit 4 3

srec_cat -Output 20.14.048-SIMM.bin -Binary \
"20.14.048 - epic 2 - u4.bin" -Binary -unsplit 4 0 \
"20.14.048 - epic 2 - u3.bin" -Binary -unsplit 4 1 \
"20.14.048 - epic 2 - u2.bin" -Binary -unsplit 4 2 \
"20.14.048 - EPIC 2 - U1.bin" -Binary -unsplit 4 3


How to Split it back into a per chip image.

srec_cat 20.14.048-SIMM-920mhz.bin -Binary -split 4 0 -Output U4-920.bin -Binary
srec_cat 20.14.048-SIMM-920mhz.bin -Binary -split 4 1 -Output U3-920.bin -Binary
srec_cat 20.14.048-SIMM-920mhz.bin -Binary -split 4 2 -Output U2-920.bin -Binary
srec_cat 20.14.048-SIMM-920mhz.bin -Binary -split 4 3 -Output U1-920.bin -Binary

0x00000 is the start of boot1

boot1 is never updated by the station.  When you go to flash the station, the ftp server an everything runs from this code.  The main sc.o code doesn't have the FTP server in it.

0x40000 is the start of boot2
BEBE CAFE BEBE CAFE then object name
FEED BEEF FEED BEEF is the end then  4 bytes
EEnd of ROM
0x80000 is the start of sc.o
0018FC54 is the start of wl.o
Wireline Images
Go check out the wireline page for updated info the below is not the most current.
Wireline 20.10.816 for AT27C010 Chips. This works with the 20.14.048 Conventional Firmware
Exciter Images
This is the matching Exciter Image for a AM27C512 UV EPROM
Code Plug format
Manuals
- Motorola Quantar Instruction Manual 68P81095E05-B with updates - Most comprehensive manual
- Quantar Satellite Receiver Instruction Manual 68P81087E25-O.pdf - This is the manual for Satellite Receiver (not AstroTac Receiver), which is basically a Quantar minus the PA/Exciter. The advantage to this is it can be used where wildcard functions are need.
- Quantar Service Manual 68P81088E90-G - this is the full service manual for the Quantar/Quantro and AstroTac
- Quantar RSS Manual R14.10.00
The PDR3500 is basically a Quantar in a portable format using a PA from a Spectra mid power radio. The basic service manual has a diagram of the backplane and glue circuits that tie this all together. It's very interesting to read as it explains quite a bit more of how the ID resistors and SPI bus works. If you're hacking quantar's, it's a must read.
- RSS Software Help file. - this is the help file from WinRSS and is quite useful for station programing tips.
- Quantar Serial Commands - Info on the serial commands the quantar station supports from the RSS port.
Hardware info
Part numbers
Here are part numbers and what the correspond to.
Power Supplies
The -48v supplies are easy to see as they have a side to side DC breaker style switch. The Motorola/Onan column refers to the manufacturer of the PS. Many people rag on the Onan power supplies, but I've not had one fail in service yet. The Onan do have a heat activated fan, whereas the Motorola run continuously. This can be good for base use or in the lab, as the base station will not make noise unless it's keyed down for some time.
| Quantar power supplies | |||
| P/N | Description | Motorola/Onan | Watts |
| CPN1031 | 48/60v input | Yes | 600 |
| CPN1049 | AC no charger | Yes | 265 |
| CPN1050 | AC with Charger | Yes | 265 |
| CPN1047 | AC no charger | Yes | 625 |
| CPN1048 | AC with Charger | Yes | 625 |
| TRN7802 | 12/24v DC | No | 210 |
| TRN7803 | 48/60v input | No | 210 |
| TRN7801 | 24v input | No | 600 |
| CPN1042 | AC | No | 700 |
| TPN6185 | AC w/Charger | ? | 625 |
| TPN1186 | No idea | ? | |
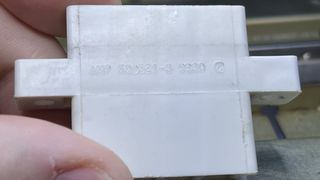
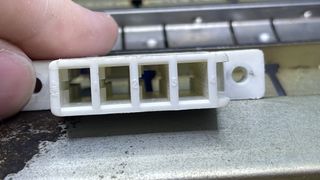
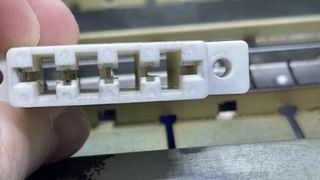
Several PSUs have a DC input on the back using a special connector pictured below. This is an AMP/TE 530521-3 4 position connector. The contacts are 5-530519-2
BackPlane
The BackPlane modules are different for the Quantar and Quantro.
Station Control info
Station Control Module or SCM is the heart of the Quantar station. The SCM comes in different revisons known as EPIC.
- EPIC I - TTN4094
- EPIC II - CLN6686F
- EPIC III - Note the EPIC3 will not work out of band. The modulation will be very low.
- EPIC IV - This is only for the Smart Zone trunking. IT will not work for conventional
- EPIC V - MCLN8447
- EPIC 6 - lol it doesn't exist. [1]
| Quantar | ||||
| EPIC | P/N Type | Conv/6809 | IntelliRepeater | Astro 25 Trunking ONLY |
| EPIC I | Board | TTN4094 | TRN7900 | N/A |
| FRU | TLN3397 | TLN3398 | N/A | |
| EPIC II | Board | CLN6961 | CLN6960 | N/A |
| FRU | CLN1293 | CLN1294 | N/A | |
| EPIC III | Board | CLN1614 | N/A | N/A |
| FRU | CLN1621 | N/A | N/A | |
| EPIC IV | Board | N/A | N/A | CLN7692 |
| FRU | N/A | N/A | DLN1229 | |
| EPIC V | Board | MCLN8426 | MCLN8447 | N/A |
| FRU | CLN8480 | CLN8479 | N/A | |
| ASTRO-TAC Receiver | ||||
| EPIC | P/N Type | Conv/6809 | Astro 25 Trunking ONLY | |
| EPIC I | Board | TTN4094 | N/A | |
| FRU | TLN3397 | N/A | ||
| EPIC II | Board | CLN6873 | CLN6873 | |
| FRU | CLN1273 | CLN1273 | ||
| EPIC V | Board | MCLN8426 | MCLN8426 | |
| FRU | CLN8480 | CLN8480 | ||
| Others | |||||||
| EPIC | P/N Type | SecureNet | Limited | PDR 3500 | DBS | ATAC 3000 | ATAC9600 |
| EPIC II | Board | CLN6961 | CLN7462 | CLN6686 | CLN7361 | CLN7361 | CCN4009 |
| FRU | CLN1609 | CLN1177 | CLN1914 | CLN1914 | CCN1009 | ||
| EPIC V | Board | MCLN8426 | N/A | N/A | N/A | N/A | N/A |
| FRU | Unknown | N/A | N/A | N/A | N/A | N/A | |
The only difference between the various versions of the EPICs (excluding EPIC IV) is the hardware is newer. There is no difference in functionality for conventional analog/astro/P25 operation.
SIMM info
The SIMM used for firmware in the Quantar EPIC 2/3 is an 80 pin SIMM and is basically unobtanimum. It is possiable to use a Motorola Console Operator Interface Module SIMM if you want to modify it.
The conventional uses 4, 29F040 chips arranged to be 32 bits wide. This means each chip stores every 4th byte.
Example we store "QUANTAR MOTOROLA" in the SIMM
| Chip 1 | Chip 2 | Chip 3 | Chip 4 |
|---|---|---|---|
| Q | U | A | N |
| T | A | R | |
| M | O | T | O |
| R | O | L | A |
So if we read Chip 1 we'd see QTMR.
The IR uses a two bank SIMM with the same layout (8 chips total)
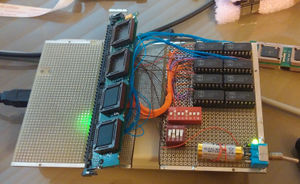
It's possible to pull these chips and read/write them if you have the right programmer. Taking advantage of this I was able to build a SIMM programmer for the soldered in place SIMM's that essentially programs one chip at a time (8bits).
It's not pretty but it works.
The SIMM has the ability to be upgraded via the SCM download procedure, but the IR SIMM and NON-IR SIMMs cannot be interchanged. This is do to the boot code being different. Using the SIMM programmer or the socketed SIMM you can reprogram the SIMM's for either.
SIMM-less SCM
It is possible to use 29F040 chips in the sockets on the EPIC 1 with just a flick of the Flash switch, this makes it easy to use the current Quantar Firmware in the EPIC 1 with just standard DIP chips.
In the later revision EPIC's the DIP sockets are only used for 27c040 chips which have a slightly different pinout. It's possible to use the SIMM images as u1-4 maps to U451-454 with a slight modification to the chips. Typically I'll bend up pins 1, (A18 on Flash, VPP on EEPROM) and 31 (!WE on Flash, A18 on EEPROM), and then connect a wire from the board at pin 31 to pin 1 on the chip. A connection to !WE on the chip is optional unless you want to be able to upgrade the chips. In this case you'll need to make a conection from SIMM pins 53, 29, 6, & 5 to the !WE lines on U451-U454 respectively.
The Quantar doesn't care about the ID pins on the SIMM, but I typically will tie 74, 75, 76, 79 to ground/pin 80. If you're doing an ATAC 3k, the ATAC does care about this and you need pins 76 and 79 tied to ground.
Of course the Intelerepeater and ATAC9k will not work in this configuration as they need two banks on the SIMM, so you can't do this if that's your requirement. For most ham stuff, there's no reason you need anything more than NIR code for Quantar and ATAC 3000.
Receiver
Like the rest of the unit the receivers are frequency dependent and consist of their own modules. The basic receiver has a preselector which is 4 MHz wide on VHF and 6 MHz wide on UHF.
The receiver is an excellent high side injection design (exception for 800/900 which is low side). The first IF is +21.45 MHz on VHF and +73.35 MHZ on UHF/800/900. The second IF is 455 KHz. In many cases barefoot (minus preselector) the receiver sensitivity is under -120dBm for 12 dB SINAD. Couple this with the great built in selectivity and it's truly a bullet proof design idea for high RF sites.
The receiver is pretty dumb, there is not a μP on the board, making it easier to troubleshoot. The devices receive their programming from the main CPU on the SCM via SPI bus. The two main chips are the U2500 receiver IC and U2401 PLL IC. U2401, the PLL, is a custom chip responsible for locking the VCOs to the proper frequency, and selecting the high or low VCO. U2500, the receiver IC, contains the 2nd IF/VCO and final processing of the intended signal. Unlike other designs, the receiver IC presents the recovered audio/data as two digital signals to the SCM where A/D conversion happens (if needed).
There are a couple other chips which present various
UHF R0 was added later and extends the coverage and tuning range of the unit down to 380 MHz. The preselctor for this covers the whole range as well.
Each item has more information on it's own page and covers conversions there as well.
| Svc Man P/N | CLD | FRU P/N | Range | Preselector | Description |
|---|---|---|---|---|---|
| TRD6361 | CLD1250 | TLN3250 | VHF R1 | TFD6511 | VHF Receiver 132-154 MHz |
| TRD6362 | CLD1260 | TLN3251 | VHF R2 | TFD6512 | VHF Receiver 150-174 MHz |
| CRX4022 | CRX1027 | DLN1215 | UHF R0 | CRX4001 | UHF Receiver 380-433 MHz |
| TRE6281 | CLE1190 | TLN3313 | UHF R1 | TLE5991 | UHF Receiver 403-433 MHz |
| TRE6282 | CLE1200 | TLN3314 | UHF R2 | TLE5992 | UHF Receiver 438-470 MHz |
| TRE6283 | CLE1210 | TLN3373 | UHF R3 | TLE5993 | UHF Receiver 470-490 MHz |
| TRE6284 | CLE1220 | TLN3374 | UHF R4 | TLE5993 | UHF Receiver 490-520 MHz |
| TRF6551 | CLF1530 | TLN3315 | 800 | N/A | 800 MHz Receiver 806-825 MHz |
| TRF6552 | CLF1540 | TLN3316 | 900 | N/A | 900 MHz Receiver 935-941 MHz |
Exciter
The exciters contain their own CPU which communicates with the SCM over a SPI bus. This CPU runs it's own firmware and requires a socketed UV EPROM to upgrade it. This also controls the PA meeting and the bit of EEPROM in the CPU stores the alignment settings for the exciter and PA. Generally a Exciter/PA pair will not need to be realigned if moved from one chassis to another, although it should be checked.
| Svc Man P/N | CLD | FRU P/N | Range | Description |
|---|---|---|---|---|
| TLD9831 | CLD1270 | TLN3252 | VHF R1 | VHF Exciter 132-154 MHz |
| TLD9832 | CLD1280 | TLN3253 | VHF R2 | VHF Exciter 150-174 MHz |
| CLX4000 | CLX1000 | DLN1214 | UHF R0 | UHF Exciter 380-433 MHz |
| TLE5971 | CLE1230 | TLN3305 | UHF R1 | UHF Exciter 403-433 MHz |
| TLE5972 | CLE1240 | TLN3306 | UHF R2 | UHF Exciter 438-470 MHz |
| TLE5973 | CLE1210 | TLN3375 | UHF R3 | UHF Exciter 470-490 MHz |
| TLE5974 | CLE1220 | TLN3376 | UHF R4 | UHF Exciter 490-520 MHz |
| TLF6920 | CLF1510 | TLN3307 | 900 | 800 MHz Exciter 850-870 MHz |
| TLF6930 | CLF1520 | TLN3308 | 900 | 900 MHz Exciter 935-941 MHz |
Station Access Module
Troof Table
There is a ID code representing the exciter type, it consists of R3700 to R3710. These are either pull up or down resistors on a 6 bit code and are identified on the schematic on the left side of U3700, the μP. Below is the table in MSB-LSB format, with a 1 being high (5v) and a 0 being a low (0v).
| Dip switch! | Band! | Binary! | Notes in the RSS! |
|---|---|---|---|
| 0 | VHF_R1 | 000000 | |
| 1 | VHF_R2 | 000001 | VHF R2 SL |
| 2 | UHF_R1 | 000010 | |
| 3 | UHF_R2 | 000011 | |
| 4 | 800 | 000100 | |
| 5 | VHF_R3 | 000101 | sl |
| 6 | VHF_R4 | 000110 | |
| 7 | VHF_R1 | 000111 | |
| 8 | VHF_R2 | 001000 | VHF R2 FL |
| 9 | VHF_R3 | 001001 | |
| 10 | VHF_R4 | 001010 | |
| 11 | 900 | 001011 | |
| 12 | UHF_R3 | 001100 | |
| 13 | UHF_R4 | 001101 | |
| 14 | blank | 001110 | |
| 15 | blank | 001111 | |
| 16 | blank | 010000 | |
| 17 | blank | 010001 | |
| 18 | blank | 010010 | |
| 19 | blank | 010011 | uhf r0 from book |
| 20 | blank | 010100 | |
| 21 | blank | 010101 | |
| 22 | blank | 010110 | |
| 23 | blank | 010111 | |
| 24 | blank | 011000 | |
| 25 | blank | 011001 | |
| 26 | blank | 011010 | |
| 27 | blank | 011011 | |
| 28 | blank | 011100 | |
| 29 | blank | 011101 | |
| 30 | blank | 011110 | |
| 31 | blank | 011111 | |
| 32 | blank | 100000 | |
| 33 | blank | 100001 | |
| 34 | blank | 100010 | |
| 35 | blank | 100011 | |
| 36 | blank | 100100 | |
| 37 | blank | 100101 | boot |
| 38 | blank | 100110 | |
| 39 | blank | 100111 | |
| 40 | blank | 101000 | |
| 41 | blank | 101001 | |
| 42 | blank | 101010 | |
| 43 | blank | 101011 | |
| 44 | blank | 101100 | |
| 45 | blank | 101101 | |
| 46 | blank | 101110 | |
| 47 | blank | 101111 | "RSS only" |
| 48 | blank | 110000 | |
| 49 | blank | 110001 | |
| 50 | blank | 110010 | |
| 51 | blank | 110011 | |
| 52 | blank | 110100 | RAP says VHF_R2 SL |
| 53 | blank | 110101 | |
| 54 | blank | 110110 | |
| 55 | blank | 110111 | |
| 56 | blank | 111000 | |
| 57 | blank | 111001 | |
| 58 | blank | 111010 | |
| 59 | blank | 111011 | |
| 60 | blank | 111100 | |
| 61 | blank | 111101 | |
| 62 | blank | 111110 | |
| 63 | INVALID | 111111 | Exciter is in reset all LED's are on and the PA fans turn on |
PDR3500
The PDR3500 is a portable version of the repeater. Here's some details and internal pics of it.
Power Amp
The power amps are actually a cool design.
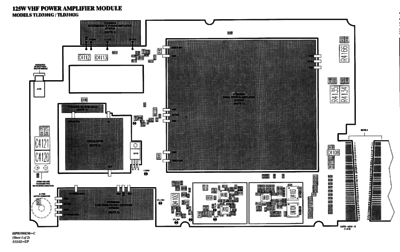
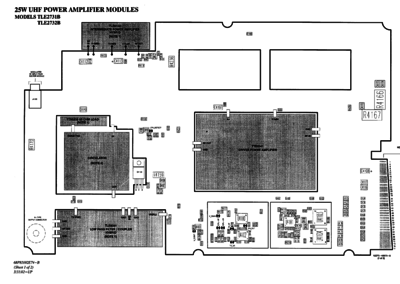
Their are two basic power amps, a 25W, and a 100/110/125w (depending on band). The power amps all use the same general board layout, with the frequency dependent parts separate from the support components. The 25W PA is a passively cooled unit with a massive heatsink, while the 100/110/125W unit has active cooling with a horizontal heatsink and two cooling fans moving air front to back.
There are a couple different revisions of the PA's so the main PCB has changed a bit over time.
[[|thumbnail|center]]
The PA doesn't contain any CPU, it's controlled via the exciter CPU with basic analog level lines going over to the exciter. Some of what's measured by the exciter
- Intermediate PA drive level - this is the output of the IPA to the final PA pallet
- Driver PA Level - output of the final PA before the circulator (FPA_DETECT).
- TX Power Forward - Output measured at the output of the Low Pass Filter
- TX Power Reverse - Reflected Power from the antenna port
- OMNI voltage - this is the control voltage on the IPA which comes from the SCM as a 0-5V control signal (V_CONT). This 0-5v controls a transistor making a 0-14v signal to provide the gain of the IPA. This is the basis of the power control. The Control Voltage from the SCM is only present during keydown.
- IPA Current detect
- DPA Side A & B current sense
- Temperature of the PA 3.981v is 79f 2.0 is about 170f This looks like an 8 bit value with 0xFF == 5.000 V or .019608v per bit.
- PA Fans turn on at 2v and off at 2.90v.
- Fan on/off and alarm
- PA_ID bits A & B - resistor divider that programs to reference voltages in .5v increments to ID the PA hardware to the exciter.
All these are measured over an TDM bus that selects each at a 200ms interval using a single analog input on the exciter CPU.
PA types
| Svc Man P/N | Other P/N | Rated Power | Range | Description | |
|---|---|---|---|---|---|
| CLD1295A | 120? | VHF? | Unknown | ||
| TLD3102 | CLD1299 | 125 | VHF R2 | VHF PA | |
| TLD3110 | 25 | VHF R1/R2 | VHF PA | ||
| TLD3101 | TLN3379 CLD1298 | 125 | VHF R1 (NEW) | VHF PA | |
| CTX1146 | DLN1216 | 110 | UHF R0 | Second Generation UHF PA 380-433 MHz | |
| TTE2061 | TLN3444 | 110 | UHF R1 | First Generation UHF PA 403-433 MHz | |
| CLE6164 | Example | 110 | UHF R1 | Second Generation UHF PA 403-433 MHz | |
| TTE2062 | TLN3446 | 110 | UHF R2 | First Generation UHF PA 438-470 MHz | |
| CLE6165 | CLE1308 | 110 | UHF R2 | Second Generation UHF PA 438-470 MHz | |
| TTE2063 | 110 | UHF R3 | First Generation UHF PA 470-490 MHz | ||
| TTE6373 | 110 | UHF R3 | Second Generation UHF PA 470-490 MHz | ||
| TTE2064 | 100 | UHF R4 | First Generation UHF PA 490-520 MHz | ||
| TTE6374 | 100 | UHF R4 | Second Generation UHF PA 490-520 MHz | ||
| CTF1091A/TLF1930 | TLN3442 | 100 | 800 | 800 MHz 100W PA | |
| CTF1092A/TLF1800 | TLN3299 | 100 | 900 | 900 MHz 100W PA |
| PA Type | PA_ID_A | PA_ID_B | R4162 | R4163 | R4164 | R4165 | Official? |
|---|---|---|---|---|---|---|---|
| 900 100W | 3.0 | .5 | 20.5k | 10k | 1k | OPEN | YES |
| 800 100W | 0.5 | 1.0 | OPEN | 0 | 1.5K | 15K | YES |
| 800 20W | 0.0 | 1.0 | OPEN | 1k | 1.5K | 15K | YES |
| UHF 110W R0 | 0.0 | 1.5 | OPEN | 0 | 390 | 1k | YES |
| UHF 110W R1 | 1.0 | 0.5 | 15k | 1.5k | 560 | 10k | YES |
| UHF 110W R2 | 1.5 | 0.5 | 1k | 390 | 100 | 1k | YES |
| UHF 110W R3 | 3.0 | 1.0 | 2.2k | 2.7k | 1.5k | 15k | YES |
| UHF 100W R4 | 3.5 | 1.0 | 18k | 15k | 1.5k | 15k | YES |
| UHF 25W R1 | 5.0 | 0.0 | 33.2k | OPEN | 0 | OPEN | YES |
| UHF 25W R2 | 0.0 | 0.5 | OPEN | 0 | 1k | OPEN | YES |
| VHF 125W R1 | 3.0 | 0.0 | 20.5k | 10k | 0 | OPEN | YES |
| VHF 125W R2 | 0.0 | 0.0 | OPEN | 0 | 0 | OPEN | YES |
| VHF 25W R1/R2 | 4.5 | 0.0 | 12k | 68k | 0 | OPEN | YES |
| VHF 25W R1 | 3.5 | 0.0 | NO |
UHF 110W Generation 1 UHF 110W Generation 2
CTF1091A 100 W 800 MHz
CTF1092A 100 W 900 MHz
CTX1146A Range 0 Power Amplifier
TLF1800B 100W Power Amplifier Module
TLF1930C 100W Power Amplifier Module
TLF1940B 20W Power Amplifier Module
TTE2061A 110W Power Amplifier UHF R1
TTE2062A 110W Power Amplifier UHF R2
TTE2063A 110W Power Amplifier UHF R3
TTE2064A 110W Power Amplifier UHF R4
TLE2511A/ 110W Power Amplifier Module TLE2512A TLE2521 TLE2572 TLE2731B 25W Power Amplifier Module UHF R1 TLE2732B 25W Power Amplifier Module UHF R2 TLD3101G 125W Power Amplifier Module VHF R1 TLD3102G 125W Power Amplifier Module VHF R2 TLD3110C 25W Power Amplifier Module VHF R1/R2 CLX4002A 100/110W Power Amplifier Module (UHF; R1-R4) CLE6164A 100/110W Power Amplifier CLE6165A Module (UHF; R1-R4)
TTE6373A/ 100/110W Power Amplifier TTE6374A Module (UHF; R1-R4)
Troubleshooting notes
Most of the time the PA's are rock solid. I have some notes below on trouble shooting them.
- swap with a known good PA, does the problem go away?
- Align the PA/init the PA
- Check the amp draw on both sides
- Always run it at 100% rated power for testing.
Silly PA syndrome
Some times people run the PA at lower output to "make it easier on it". So long as cooling is working, running it at rated output is the least stressful way to operate it. Running at reduced power output is actually harder on the PA.
The PA has an intermediate stage and a final amp stage. The final amp runs at the same gain level all the time. The power out is changed by varying the IPA voltage. As this is done via a linear regulator, as the power output goes down, there is more and more power dissipated in the Q4100 (UHF) pass transistor. This is due to running the IPA at lower and lower voltage to drop the power to the final. Typically what happens is a station will key up, then fail and try to fall back in power, but this just makes it worse.
What I've done to test this:
- Run the PA at 120% (ie 150w output) just for a bit. ie init it and align it for 110w = 130W.
- Test the station, key it down and check that it's solid for 2-3 min.
- check the value of the OMNI Voltage in the station metering.
If this is good, replace the Q4100, and check the operation of the power control circuits (q4101, V_CONT, VOMNI).
This normally fixes it.
- ↑ my theory on this is eBay sellers searched the part number CLN7692 and found this page and then read 'IV' as 6 not 4. https://www.youtube.com/watch?v=Exiy5eVMzg4
